How to Protect Design Intellectual Property with Autodesk Inventor?
Several companies in the engineering and manufacturing field use Autodesk inventors in their process, including sensitive and confidential data. Today, there are millions of files coming and going in cyberspace in this modern business world. Companies should protect their Intellectual Property (IP).
It’s essential when manufacturing a product. As it takes countless hours of engineers’ time, not to mention a company’s reputation if a “knockoff “product adds a lesser classic hit to the market. We have found that as industries work, we see the need to work with Architects or architectural design firms with bringing solid mechanical models.
There are boilers or mezzanines into Revit that represent placement, shape and size. Regardless of the situation, we would like to keep all intellectual property safe. This is why Autodesk worked so hard to prevent this with Autodesk Inventor simplification. It allows the user to create a simple version for the consumer by providing critical design information. We help you learn this crucial tool by using it in a great way.
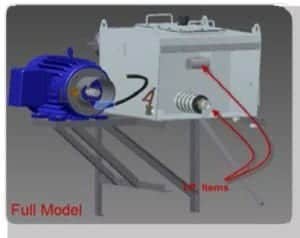
THE FULL MODEL
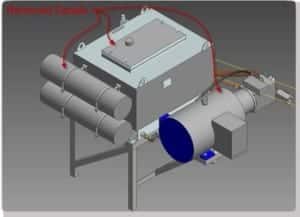
Below is the section that creates internal and external items that provide the customer with the model for planning purposes in Autodesk. They require few connection points. One can do it in a few ways, and the first is to create the shell of the original model as its single part. Another one is to create basic shapes to represent the model.
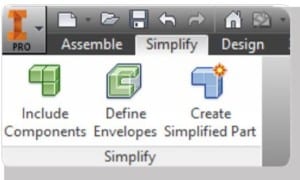
COMPONENTS INCLUDED
The first step is to protect your intellectual property from simplifying the tab. It helps to choose the components that include what we do with the Include Components command.
After selection cover
The components come with a mini toolbar. It allows you to choose various options from the dropdown menu. The first drop down comes with an opportunity to view all components. It included internal and external constituents. We find it most helpful to switch between the three viewing options while making my selections. It allows reviewing any missing parts which should not be included. As shown in the screen, it captures below what each option does. The dropdown option mainly refers to choosing part, component, or other parent priority. After choosing your options and selecting what needs to be included, click the checkmark to finish this part of the process.
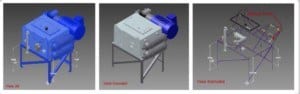
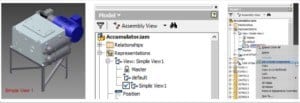
VIEW-MASTER
Once you finish including components, you’ll notice that you can no longer see any items that aren’t included. If we look at our View-Master, the command automatically creates a view called Simple View 1. Get the right click on this view in the browser with editing the selections.
CREATE SIMPLIFIEDPART
The third step is to select “Simplified Part”. This launches a new dialogue box and the standard new part creation options. It primarily uses a file that saves location and name. It includes options for what type of part you create and combining style buttons. The options are:
- A single solid body that seems between faces merged.
- It helps to maintain the body separately.
- It primarily uses single solid body with seems between faces maintained
- It’s used for our purposes and now see the BIM tab opened for further simplification.
Note: It uses simple View 1 along with the current view. It always helps to create a Simple Folder for all simplified parts.

FURTHER SIMPLIFICATION AND BIM TAB
At this point, the model is simplified with a great deal. One can simplify it more using the Simplify section of the BIM Tab. We will include the other half of the BIM Tab in the following paper.
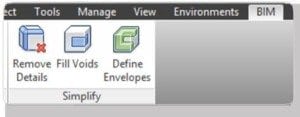
REMOVE DETAILS
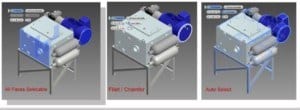
The first look removes details commands that recognize fillets and chamfers and custom selected faces. It utilizes a mini toolbar for any options. It looks at the mini toolbar. We provide a few options for items to remove. The All Faces Selectable allows selecting faces. We added Fillet and Chamfer selection box set by default. Our last Option is Auto Select. Use the screen that captures below with understanding how these options work.
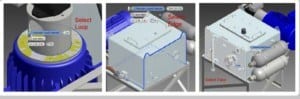
FILL VOIDS
The second option here covers simplification with Fill Voids. It uses a prospect that fills holes and spaces with surface patches. This leaves a smooth surface that selects besides the auto Select by select loop, select edge, select face and more.
Check below to view how these tools function.
DEFINE ENVELOPES
The third option simplifies the parts further with the Defined Envelopes option. The option replaces a part or object used in the solid object form of a cylinder or box. Our choices on this toolbar are used for the bounding box and the bounding cylinder for the first button. Join or add new solid in the second button, and our selection methods faces are solid. See below for examples.
If you all need any help regarding the design and drafting services, please don’t hesitate to connect with us. We are the best leading Australian Design and Drafting Services company in Australia. Call us 1800 287 223 (Toll-Free) Australia Wide.